
Understanding Stateless & Stateful Widgets in Flutter
Introduction
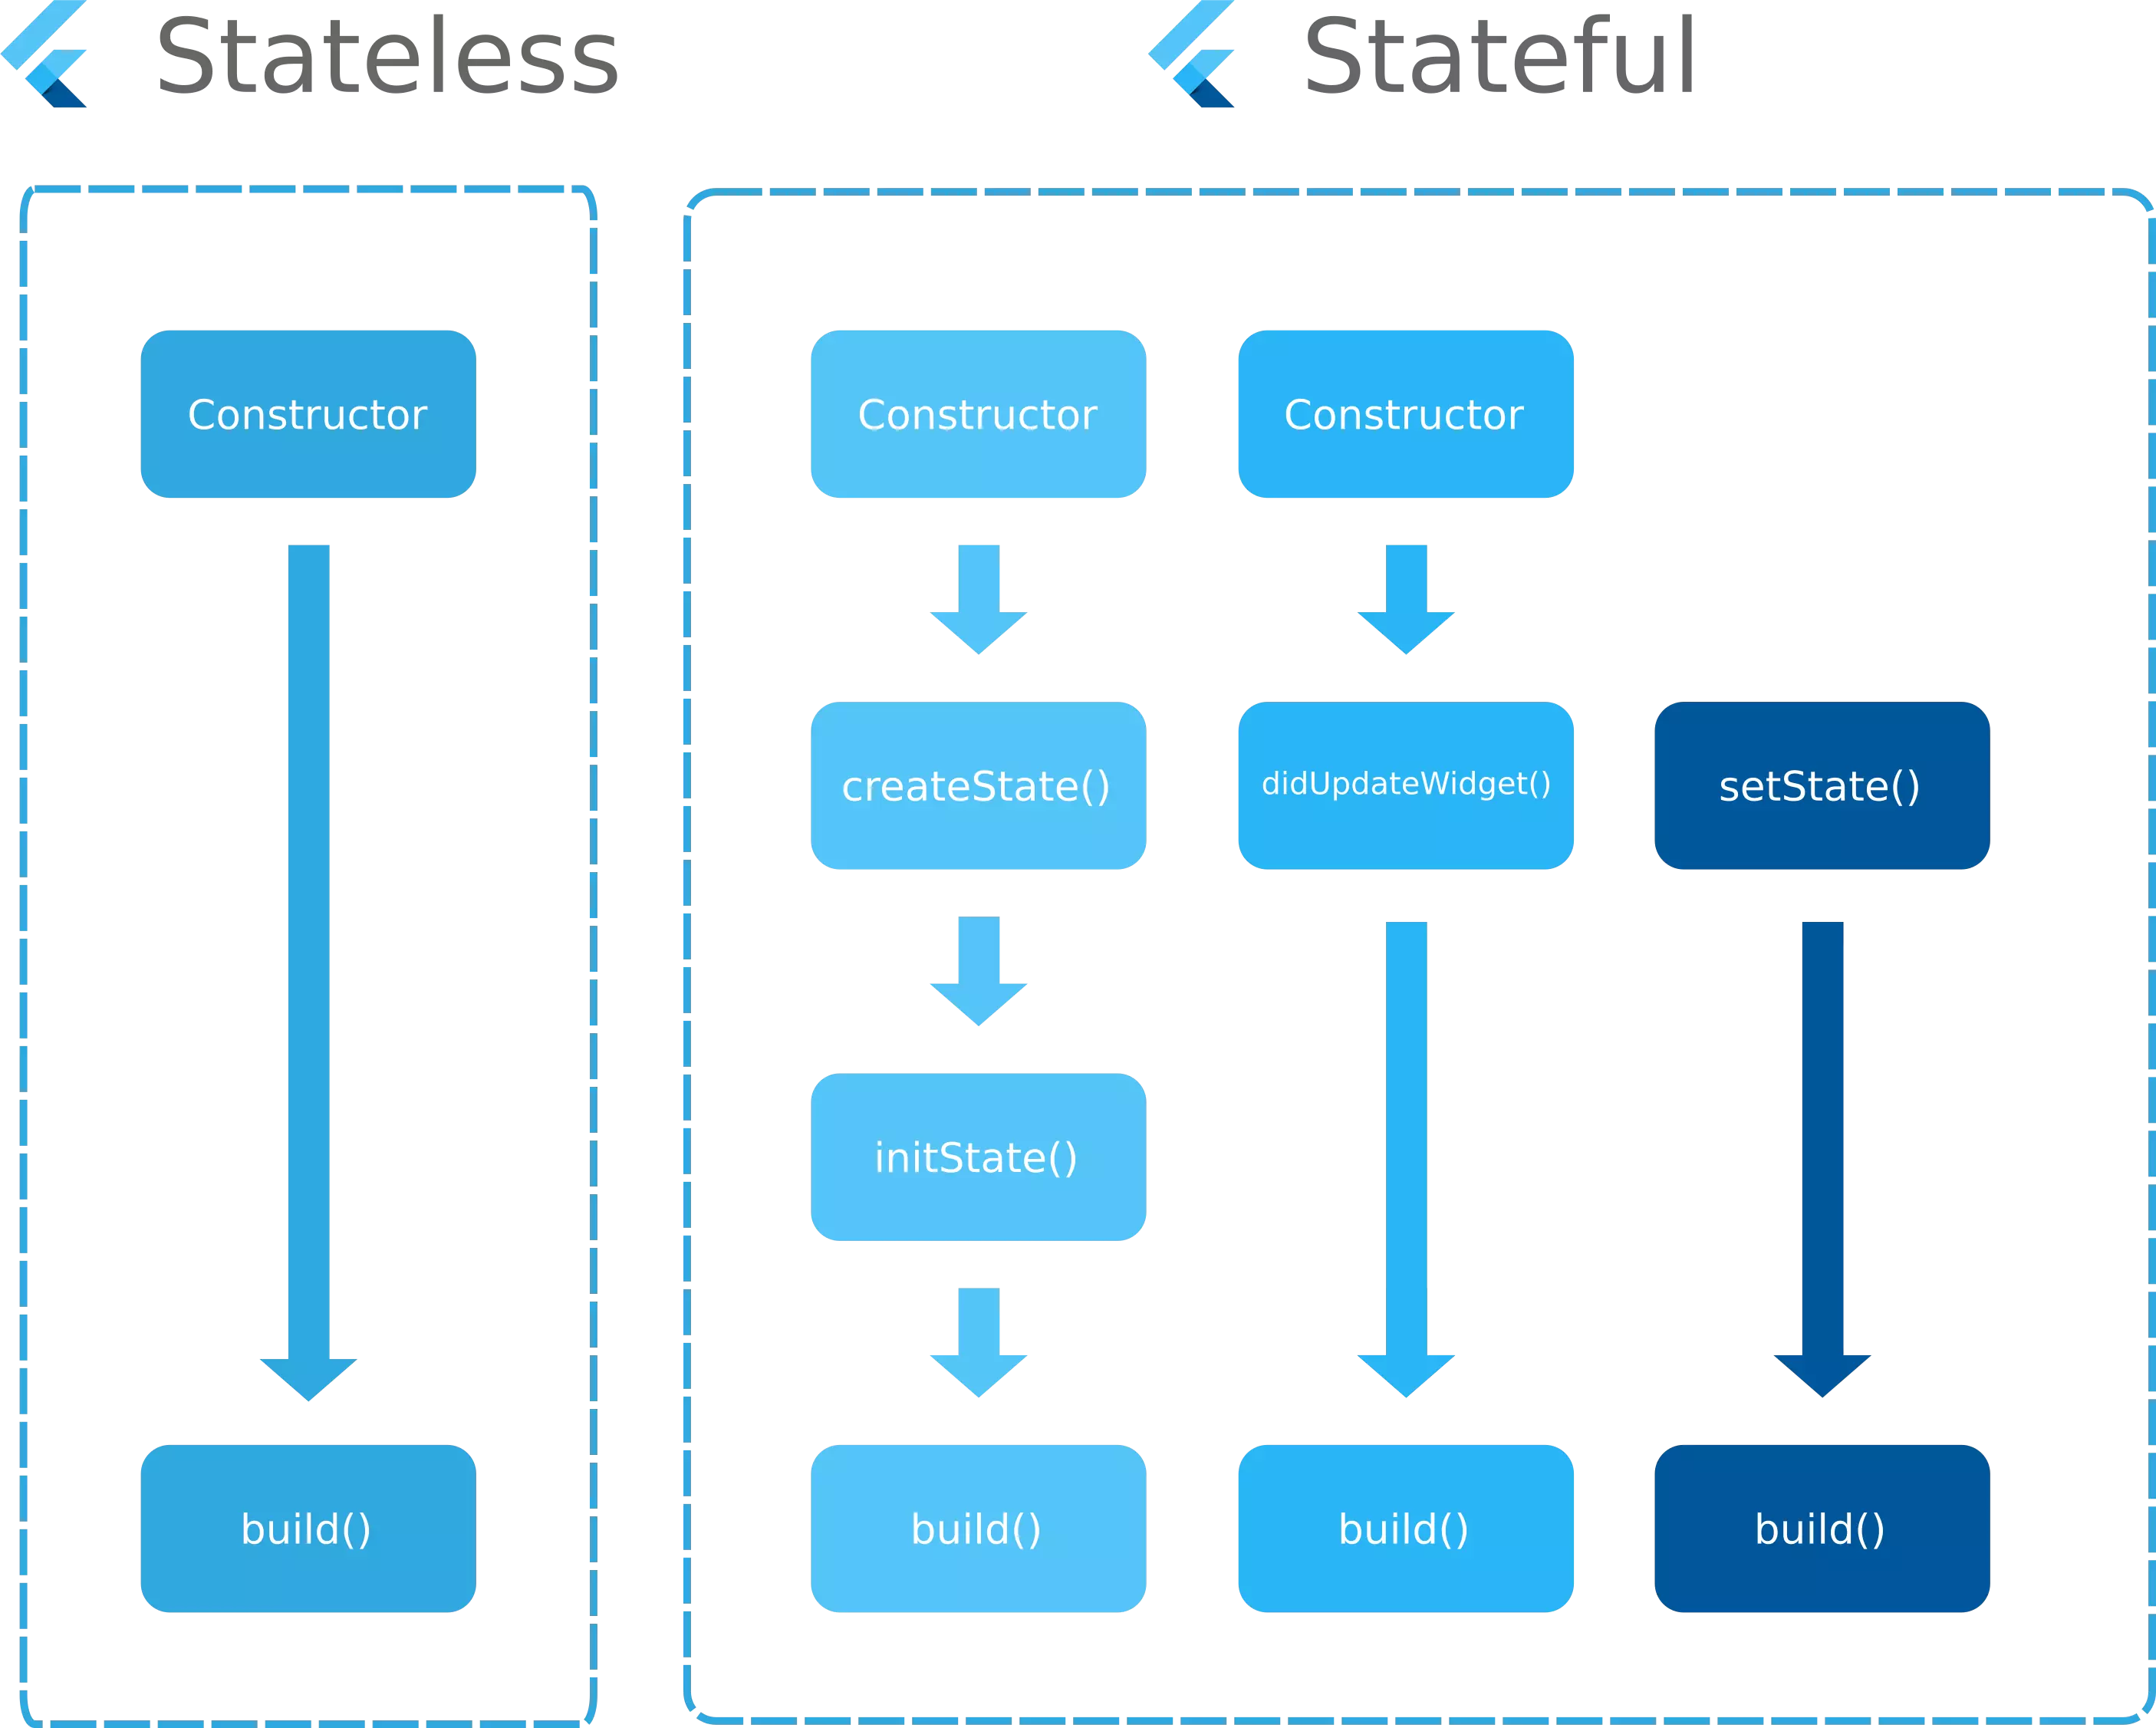
Flutter is a powerful framework for building modern mobile applications, and at its core are widgets. Every UI component in Flutter is a widget, and they are mainly divided into two types:
-
Stateless Widgets (Static UI)
-
Stateful Widgets (Dynamic UI)
Understanding how these widgets work is essential for building interactive, responsive, and scalable mobile applications.
In this blog, you will learn:
-
What Stateless and Stateful Widgets are
-
When to use each type
-
How UI updates work in Flutter
-
State management using
setState() -
Real-time Flutter (Dart) examples
Previous Lesson: Layouts in Flutter: Column, Row, Stack, Expanded & Flexible Guide
What are Stateless & Stateful Widgets?
Definition
Stateless Widget
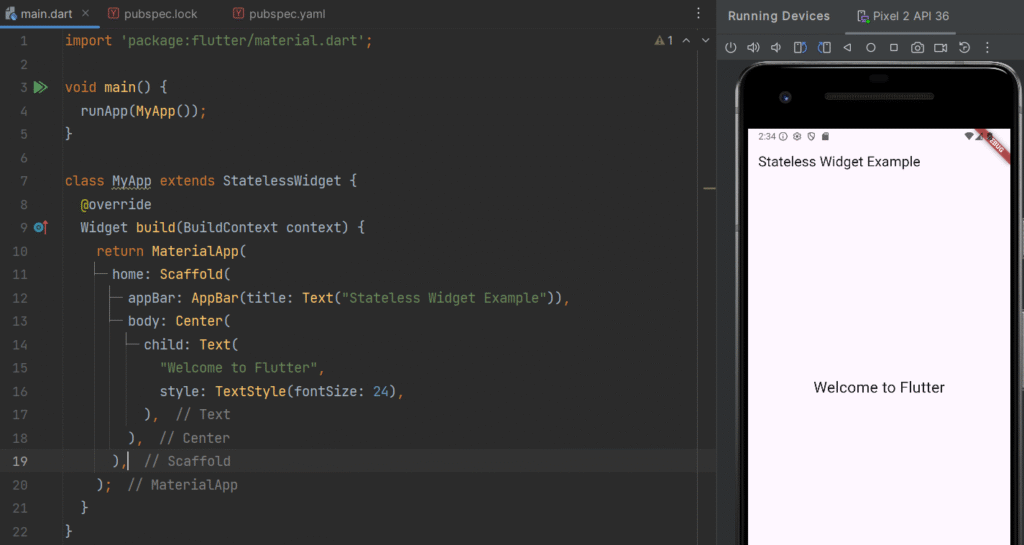
A Stateless Widget is a widget that does not change its state once it is built. It displays static content and does not respond to user interaction.

Key Characteristics:
-
Immutable (cannot change)
-
Lightweight
-
Faster rendering
-
No internal state
Example of Stateless Widget
import 'package:flutter/material.dart';

void main() {
  runApp(MyApp());
}

class MyApp extends StatelessWidget {
  @override
  Widget build(BuildContext context) {
    return MaterialApp(
      home: Scaffold(
        appBar: AppBar(title: Text("Stateless Widget Example")),
        body: Center(
          child: Text(
            "Welcome to Flutter",
            style: TextStyle(fontSize: 24),
          ),
        ),
      ),
    );
  }
}
Real-Time Use Case
-
Displaying static text
-
App logos
-
Headers and titles
-
About pages
Example: A welcome screen in a mobile app.
Stateful Widget
Definition
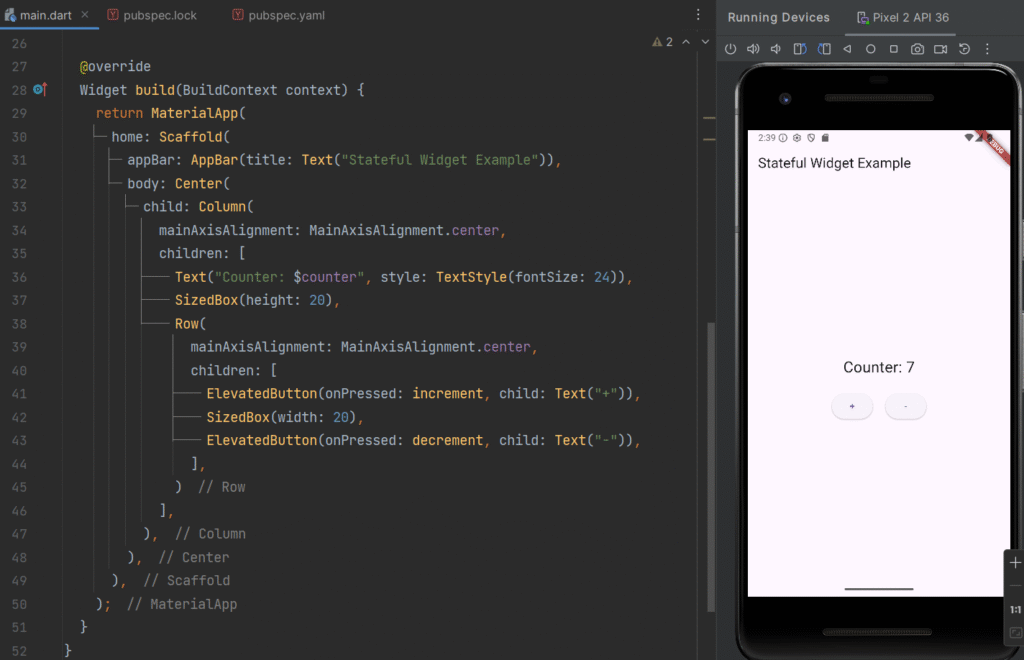
A Stateful Widget is a widget that can change its state during runtime. It allows dynamic updates in the UI when data changes or user interacts.

Key Characteristics:
-
Mutable (state can change)
-
Supports user interaction
-
Rebuilds UI using
setState()
Example of Stateful Widget (Counter App)
import 'package:flutter/material.dart';

void main() {
  runApp(MyCounterApp());
}

class MyCounterApp extends StatefulWidget {
  @override
  _MyCounterAppState createState() => _MyCounterAppState();
}

class _MyCounterAppState extends State<MyCounterApp> {
  int counter = 0;

  void increment() {
    setState(() {
      counter++;
    });
  }

  void decrement() {
    setState(() {
      counter--;
    });
  }

  @override
  Widget build(BuildContext context) {
    return MaterialApp(
      home: Scaffold(
        appBar: AppBar(title: Text("Stateful Widget Example")),
        body: Center(
          child: Column(
            mainAxisAlignment: MainAxisAlignment.center,
            children: [
              Text("Counter: $counter", style: TextStyle(fontSize: 24)),
              SizedBox(height: 20),
              Row(
                mainAxisAlignment: MainAxisAlignment.center,
                children: [
                  ElevatedButton(onPressed: increment, child: Text("+")),
                  SizedBox(width: 20),
                  ElevatedButton(onPressed: decrement, child: Text("-")),
                ],
              )
            ],
          ),
        ),
      ),
    );
  }
}
Real-Time Use Case
-
Shopping cart updates
-
Counter apps
-
Form inputs
-
Live dashboards
Example: Cart quantity increase/decrease in an e-commerce app
When to Use Stateless vs Stateful Widgets
Use Stateless Widget When:
-
Data is fixed
-
UI does not change
-
No user interaction
Examples:
-
Labels
-
Icons
-
Static pages
Use Stateful Widget When:
-
UI updates dynamically
-
User interaction is required
-
Data changes frequently
Examples:
-
Buttons
-
Forms
-
Toggles
-
Counters
Handling UI Updates with Stateful Widgets
Concept
In Flutter, UI updates occur when the state changes. The setState() method notifies Flutter to rebuild the widget with updated data.
Step-by-Step Working
-
User performs an action (button click)
-
State variable updates
-
setState()is called -
UI rebuilds automatically
Example: Toggle Button
import 'package:flutter/material.dart';

void main() {
  runApp(ToggleExample());
}


class ToggleExample extends StatefulWidget {
  @override
  _ToggleExampleState createState() => _ToggleExampleState();
}

class _ToggleExampleState extends State<ToggleExample> {
  bool isOn = false;

  void toggleSwitch() {
    setState(() {
      isOn = !isOn;
    });
  }

  @override
  Widget build(BuildContext context) {
    return Scaffold(
      appBar: AppBar(title: Text("Toggle Example")),
      body: Center(
        child: Column(
          mainAxisAlignment: MainAxisAlignment.center,
          children: [
            Text(
              isOn ? "ON" : "OFF",
              style: TextStyle(fontSize: 24),
            ),
            ElevatedButton(
              onPressed: toggleSwitch,
              child: Text("Toggle"),
            ),
          ],
        ),
      ),
    );
  }
}
Real-Time Use Case
-
Dark/Light mode toggle
-
Notification ON/OFF
-
Smart home controls
State Management Using setState()
Definition
setState() is a method used in Stateful Widgets to update the UI whenever the state changes.
It tells Flutter:
“Rebuild this widget with updated values.”
Key Features of setState()
-
Triggers UI rebuild
-
Simple and easy to use
-
Best for small apps
-
Not suitable for large-scale apps (use Provider, Bloc, etc.)
Example: Like Button
import 'package:flutter/material.dart';

void main() {
  runApp(MyApp());
}

class MyApp extends StatelessWidget {
  @override
  Widget build(BuildContext context) {
    return MaterialApp(
      home: LikeButton(),
    );
  }
}
class LikeButton extends StatefulWidget {
  @override
  _LikeButtonState createState() => _LikeButtonState();
}

class _LikeButtonState extends State<LikeButton> {
  bool isLiked = false;

  void toggleLike() {
    setState(() {
      isLiked = !isLiked;
    });
  }

  @override
  Widget build(BuildContext context) {
    return IconButton(
      icon: Icon(
        isLiked ? Icons.favorite : Icons.favorite_border,
        color: Colors.red,
      ),
      onPressed: toggleLike,
    );
  }
}
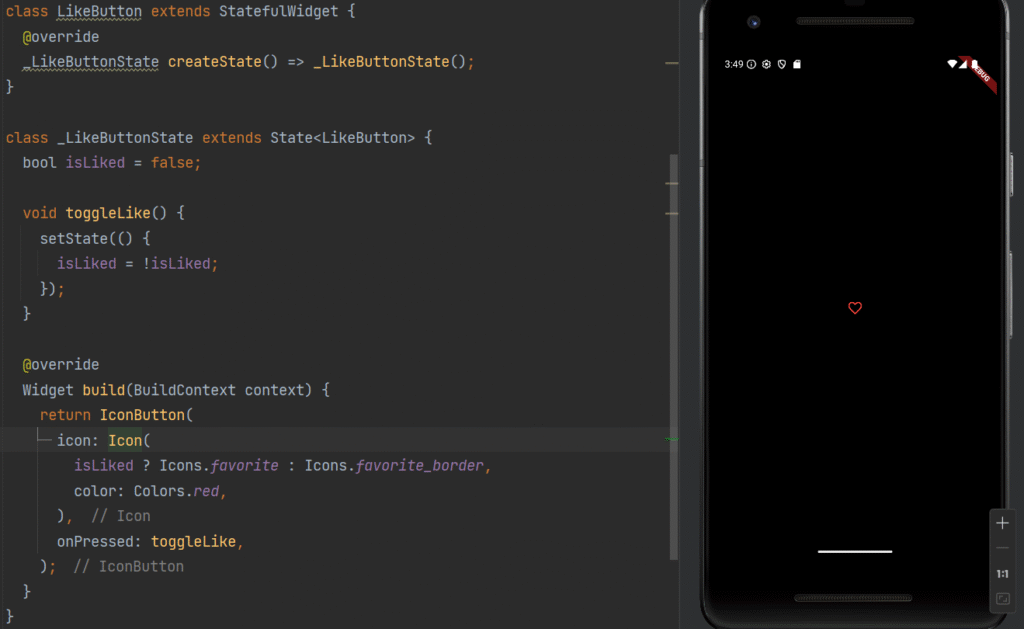
Real-Time Use Case
-
Social media likes
-
Wishlist feature
-
Favorite items
Complete Real-Time Example – Simple Shopping Cart
import 'package:flutter/material.dart';

void main() {
  runApp(ShoppingApp());
}

class ShoppingApp extends StatefulWidget {
  @override
  _ShoppingAppState createState() => _ShoppingAppState();
}

class _ShoppingAppState extends State<ShoppingApp> {
  int quantity = 1;

  void increase() {
    setState(() {
      quantity++;
    });
  }

  void decrease() {
    setState(() {
      if (quantity > 1) quantity--;
    });
  }

  @override
  Widget build(BuildContext context) {
    return MaterialApp(
      home: Scaffold(
        appBar: AppBar(title: Text("Shopping Cart")),
        body: Center(
          child: Column(
            mainAxisAlignment: MainAxisAlignment.center,
            children: [
              Text("Product Quantity: $quantity",
                  style: TextStyle(fontSize: 22)),
              SizedBox(height: 20),
              Row(
                mainAxisAlignment: MainAxisAlignment.center,
                children: [
                  ElevatedButton(onPressed: increase, child: Text("+")),
                  SizedBox(width: 20),
                  ElevatedButton(onPressed: decrease, child: Text("-")),
                ],
              )
            ],
          ),
        ),
      ),
    );
  }
}
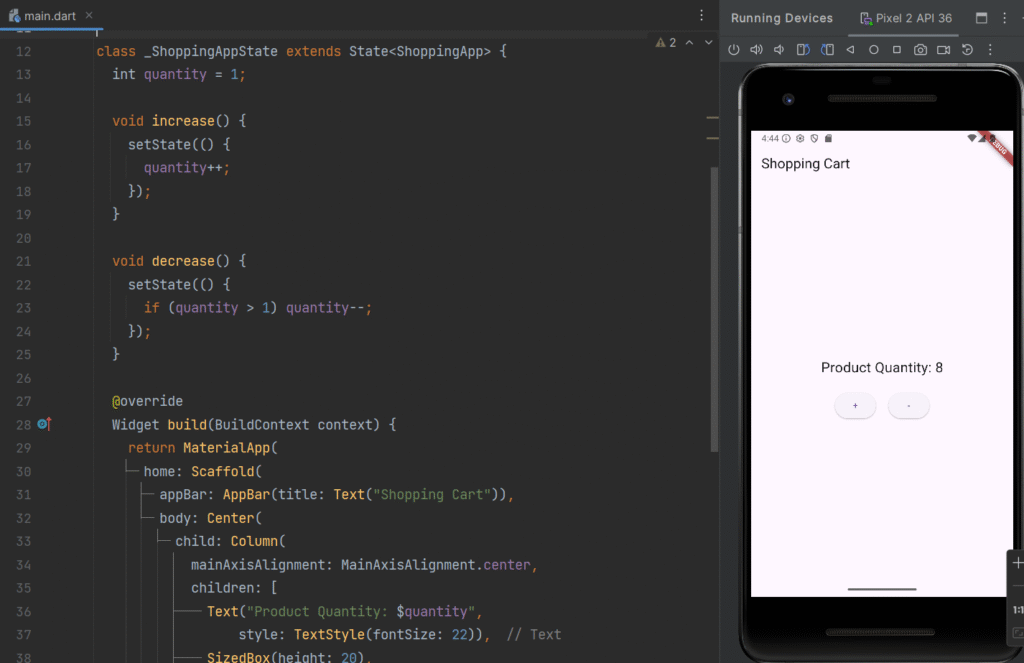
Real-Time Application Scenario
This example is used in:
-
E-commerce apps
-
Inventory systems
-
Billing systems
-
Order management systems
Key Takeaways
-
Flutter UI is built using widgets
-
Stateless Widgets = Static UI
-
Stateful Widgets = Dynamic UI
-
setState()is used to update UI -
Choose widget type based on behavior
-
Proper state management improves performance
Conclusion
Understanding Stateless and Stateful Widgets is essential for building interactive Flutter applications. While Stateless Widgets handle static content, Stateful Widgets allow dynamic updates using setState().
By mastering these concepts, developers can create real-world mobile applications such as dashboards, e-commerce apps, and interactive tools efficiently.
Lesson 07: Navigation in Flutter: Complete Guide to Navigator, Passing Data & Named Routes
Subscribe for More
Subscribe to our blog and stay updated with the latest Flutter tutorials, real-world projects, and mobile app development guides to boost your development skills and career.

")
