How to Build a Flutter App with SQLite Database
![]()
Table of Contents
- Introduction
- Why Use SQLite in Flutter
- Project Overview
- Prerequisites
- Step 1: Create Flutter Project
- Step 2: Add Dependencies
- Step 3: Create Database Model
- Step 4: Database Helper Class
- Step 5: Implement CRUD Operations
- Step 6: Build UI
- Step 7: Connect UI with Database
- Step 8: Run and Test App
- Best Practices
- Conclusion
1. Introduction
In modern mobile app development, storing data locally is crucial for performance and offline access. Flutter provides excellent support for local databases using SQLite.
This guide walks you through building a complete Flutter app with SQLite, including CRUD operations (Create, Read, Update, Delete).
2. Why Use SQLite in Flutter
SQLite is a lightweight, embedded database that works perfectly for mobile apps.
Benefits:
- Offline data storage
- Fast performance
- No server required
- Easy integration with Flutter via
sqflite
3. Project Overview
We will build a simple Task Manager App where users can:
- Add tasks
- View tasks
- Update tasks
- Delete tasks
4. Prerequisites
Before starting:
- Install Flutter SDK
- Install Android Studio / VS Code
- Basic knowledge of Dart & Flutter
Why Use SQLite in Flutter (With Real-World Examples)
SQLite is a lightweight, embedded relational database that runs directly inside your Flutter app—no internet or external server required.
Let’s break this down with practical, real-world scenarios 👇
Example 1: To-Do / Task Manager App
Imagine you are building a Task Manager App:
- User adds tasks
- Updates tasks
- Deletes tasks
👉 Without SQLite:
- Data is lost when the app closes
👉 With SQLite:
- Tasks are saved permanently on device
Conclusion: SQLite ensures data persistence
Example 2: E-Commerce Cart System
In an e-commerce app:
- Users add items to cart
- Close app
- Return later
👉 Without SQLite:
- Cart resets → bad user experience ❌
👉 With SQLite:
- Cart remains saved locally ✔
Conclusion: SQLite improves user experience and retention
Example 3: Offline-First Apps
Consider apps like:
- Note-taking apps
- Field data collection apps
- Rural area apps with poor internet
👉 SQLite allows:
- Store data offline
- Sync later when internet is available
Conclusion: SQLite enables offline functionality
Example 4: Data-Heavy Applications
Apps that manage structured data:
- Student records system
- Inventory management
- Library systems
👉 SQLite provides:
- Tables
- Relationships
- Structured queries
Conclusion: SQLite is ideal for structured data management
Key Benefits Summary
| Feature | Benefit |
|---|---|
| Offline Storage | Works without internet |
| Fast Access | Local queries are quick |
| Lightweight | No server needed |
| Structured Data | Uses SQL queries |
| Persistent | Data remains after app restart |
When You Should NOT Use SQLite
SQLite is powerful—but not always the best choice.
Avoid SQLite when:
- You need real-time sync across users
- You require cloud-based storage
- Your app is multi-device dependent
👉 Use instead:
- Firebase Firestore
- REST APIs + backend
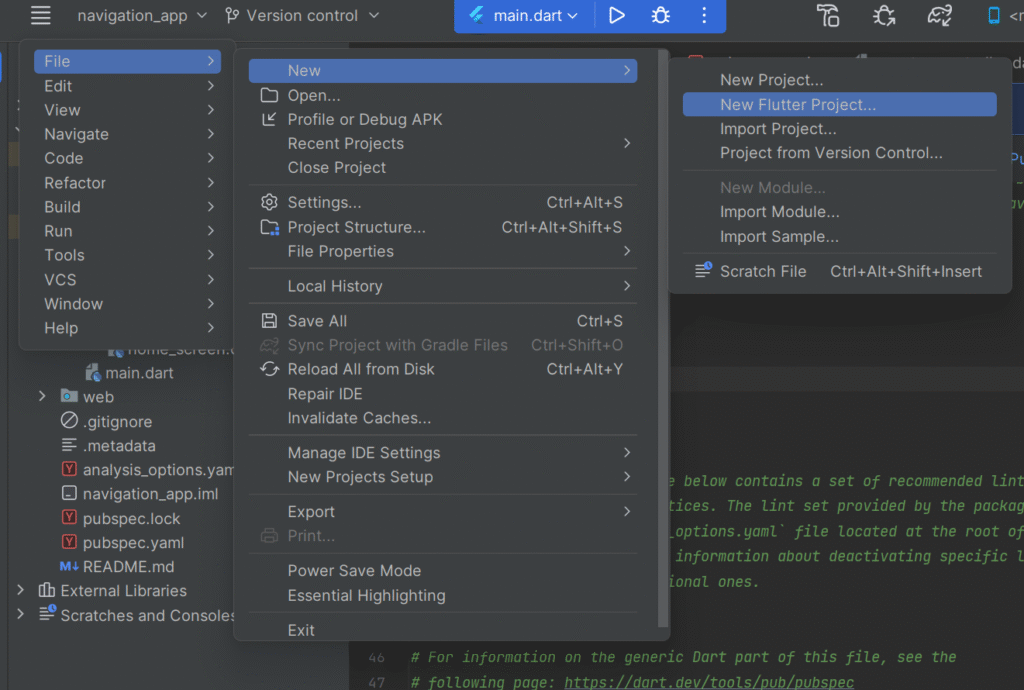
5. Step 1: Create Flutter Project
You may create from prompt or console:
flutter create flutter_sqlite_app
cd flutter_sqlite_app
6. Step 2: Add Dependencies
dependencies:
  flutter:
    sdk: flutter
  cupertino_icons: ^1.0.8
  sqflite: ^2.3.0
  path: ^1.8.3
Step 3: main.dart
import 'package:flutter/material.dart';
import 'screens/home_screen.dart';

void main() {
  runApp(MyApp());
}

class MyApp extends StatelessWidget {
  @override
  Widget build(BuildContext context) {
    return MaterialApp(
      debugShowCheckedModeBanner: false,
      title: 'SQLite App',
      home: HomeScreen(),
    );
  }
}
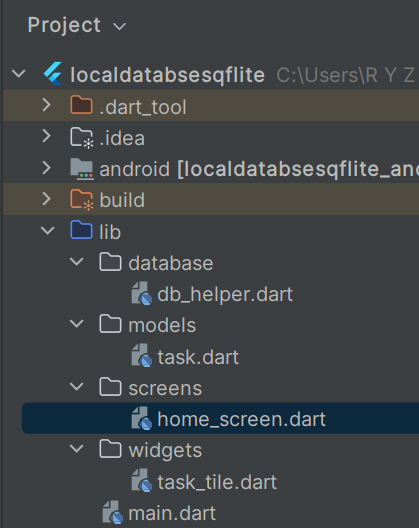
Step 4: Model (models/task.dart)
class Task {
  int? id;
  String title;

  Task({this.id, required this.title});

  Map<String, dynamic> toMap() {
    return {
      'id': id,
      'title': title,
    };
  }

  factory Task.fromMap(Map<String, dynamic> map) {
    return Task(
      id: map['id'],
      title: map['title'],
    );
  }
}
Step 5: Database Helper (database/db_helper.dart)
import 'package:sqflite/sqflite.dart';
import 'package:path/path.dart';
import '../models/task.dart';

class DBHelper {
  static final DBHelper _instance = DBHelper._internal();
  static Database? _database;

  factory DBHelper() => _instance;

  DBHelper._internal();

  Future<Database> get database async {
    if (_database != null) return _database!;
    _database = await _initDB();
    return _database!;
  }

  Future<Database> _initDB() async {
    String path = join(await getDatabasesPath(), 'tasks.db');

    return await openDatabase(
      path,
      version: 1,
      onCreate: (db, version) async {
        await db.execute('''
          CREATE TABLE tasks(
            id INTEGER PRIMARY KEY AUTOINCREMENT,
            title TEXT
          )
        ''');
      },
    );
  }

  // INSERT
  Future<int> insertTask(Task task) async {
    final db = await database;
    return await db.insert('tasks', task.toMap());
  }

  // READ
  Future<List<Task>> getTasks() async {
    final db = await database;
    final List<Map<String, dynamic>> maps = await db.query('tasks');

    return maps.map((e) => Task.fromMap(e)).toList();
  }

  // UPDATE
  Future<int> updateTask(Task task) async {
    final db = await database;
    return await db.update(
      'tasks',
      task.toMap(),
      where: 'id = ?',
      whereArgs: [task.id],
    );
  }

  // DELETE
  Future<int> deleteTask(int id) async {
    final db = await database;
    return await db.delete(
      'tasks',
      where: 'id = ?',
      whereArgs: [id],
    );
  }
}
Step 6: UI Screen (screens/home_screen.dart)
import 'package:flutter/material.dart';
import '../database/db_helper.dart';
import '../models/task.dart';
import '../widgets/task_tile.dart';

class HomeScreen extends StatefulWidget {
  @override
  _HomeScreenState createState() => _HomeScreenState();
}

class _HomeScreenState extends State<HomeScreen> {
  final DBHelper dbHelper = DBHelper();
  List<Task> tasks = [];

  @override
  void initState() {
    super.initState();
    loadTasks();
  }

  void loadTasks() async {
    final data = await dbHelper.getTasks();
    setState(() {
      tasks = data;
    });
  }

  void addTask(String title) async {
    await dbHelper.insertTask(Task(title: title));
    loadTasks();
  }

  void updateTask(Task task) async {
    await dbHelper.updateTask(task);
    loadTasks();
  }

  void deleteTask(int id) async {
    await dbHelper.deleteTask(id);
    loadTasks();
  }

  void showDialogBox({Task? task}) {
    TextEditingController controller =
    TextEditingController(text: task?.title ?? "");

    showDialog(
      context: context,
      builder: (_) => AlertDialog(
        title: Text(task == null ? "Add Task" : "Update Task"),
        content: TextField(
          controller: controller,
          decoration: InputDecoration(hintText: "Enter task"),
        ),
        actions: [
          TextButton(
            onPressed: () {
              if (task == null) {
                addTask(controller.text);
              } else {
                task.title = controller.text;
                updateTask(task);
              }
              Navigator.pop(context);
            },
            child: Text("Save"),
          ),
        ],
      ),
    );
  }

  @override
  Widget build(BuildContext context) {
    return Scaffold(
      appBar: AppBar(
        title: Text("SQLite Task Manager"),
      ),
      body: ListView.builder(
        itemCount: tasks.length,
        itemBuilder: (context, index) {
          return TaskTile(
            task: tasks[index],
            onEdit: () => showDialogBox(task: tasks[index]),
            onDelete: () => deleteTask(tasks[index].id!),
          );
        },
      ),
      floatingActionButton: FloatingActionButton(
        onPressed: () => showDialogBox(),
        child: Icon(Icons.add),
      ),
    );
  }
}
Step 7: Widget (widgets/task_tile.dart)
import 'package:flutter/material.dart';
import '../models/task.dart';

class TaskTile extends StatelessWidget {
  final Task task;
  final VoidCallback onEdit;
  final VoidCallback onDelete;

  TaskTile({
    required this.task,
    required this.onEdit,
    required this.onDelete,
  });

  @override
  Widget build(BuildContext context) {
    return Card(
      child: ListTile(
        title: Text(task.title),
        trailing: Row(
          mainAxisSize: MainAxisSize.min,
          children: [
            IconButton(
              icon: Icon(Icons.edit, color: Colors.blue),
              onPressed: onEdit,
            ),
            IconButton(
              icon: Icon(Icons.delete, color: Colors.red),
              onPressed: onDelete,
            ),
          ],
        ),
      ),
    );
  }
}
Best Practices
- Use Singleton pattern for DBHelper
- Avoid blocking UI (use async/await)
- Handle exceptions properly
- Use State Management (Provider, GetX, Bloc) for scalability
- Normalize database schema
Conclusion
Building a Flutter app with SQLite is essential for offline-first applications. With sqflite, you can efficiently manage structured data locally.
This step-by-step guide covered:
- Database setup
- CRUD operations
- UI integration
You now have a complete foundation to build scalable Flutter apps with local storage.
")

")