
Navigation in Flutter: Navigator, Passing Data & Named Routes
Introduction
Navigation is a fundamental concept in mobile app development. In Flutter, navigation allows users to move between different screens (also called routes). Flutter provides a powerful navigation system using the Navigator class, making it easy to manage screen transitions and data flow.
In this blog, you will learn:
-
Navigation between screens using Navigator
-
Passing data between screens
-
Using named routes for scalable apps
-
Practical Flutter code examples
Lesson 06: Stateless vs Stateful Widgets in Flutter with setState (Complete Guide)
What is Navigation in Flutter?
In Flutter, each screen is represented as a Widget. Navigation means moving from one widget (screen) to another.
Flutter uses a stack-based navigation system, where:
-
New screens are pushed onto the stack
-
Old screens are popped from the stack
1. Navigation Between Screens Using Navigator
The Navigator class is used to manage routes (screens).
Key Methods:
-
Navigator.push()→ Move to a new screen -
Navigator.pop()→ Go back to previous screen
Example: Basic Navigation
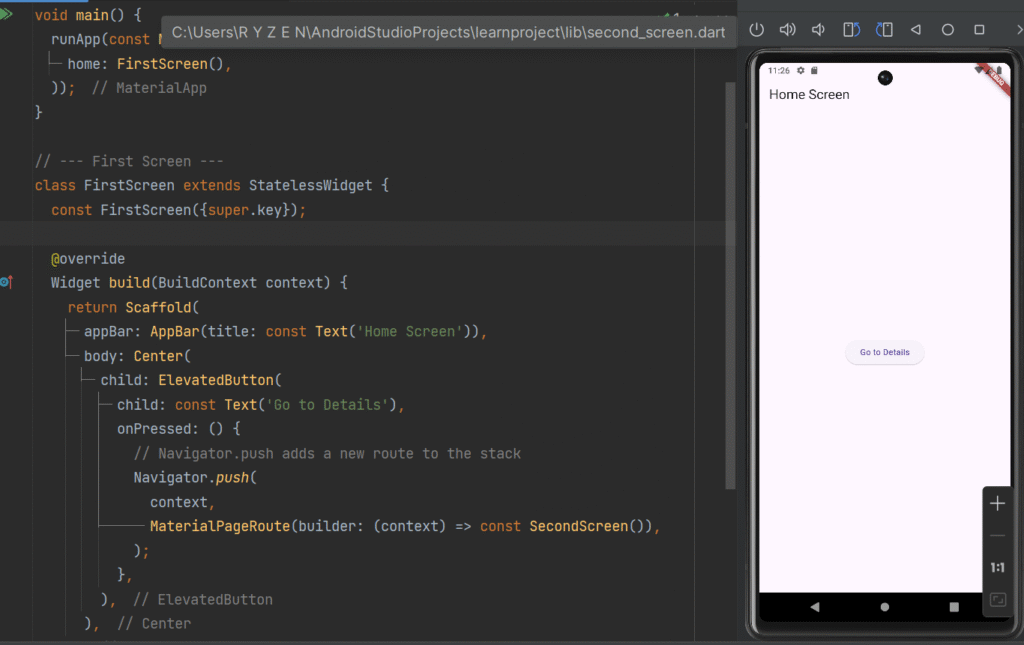
Step 1: Create First Screen
import 'package:flutter/material.dart';
import 'package:learnproject/second_screen.dart';

void main() {
  runApp(const MaterialApp(
    home: FirstScreen(),
  ));
}

// --- First Screen ---
class FirstScreen extends StatelessWidget {
  const FirstScreen({super.key});

  @override
  Widget build(BuildContext context) {
    return Scaffold(
      appBar: AppBar(title: const Text('Home Screen')),
      body: Center(
        child: ElevatedButton(
          child: const Text('Go to Details'),
          onPressed: () {
            // Navigator.push adds a new route to the stack
            Navigator.push(
              context,
              MaterialPageRoute(builder: (context) => const SecondScreen()),
            );
          },
        ),
      ),
    );
  }
}
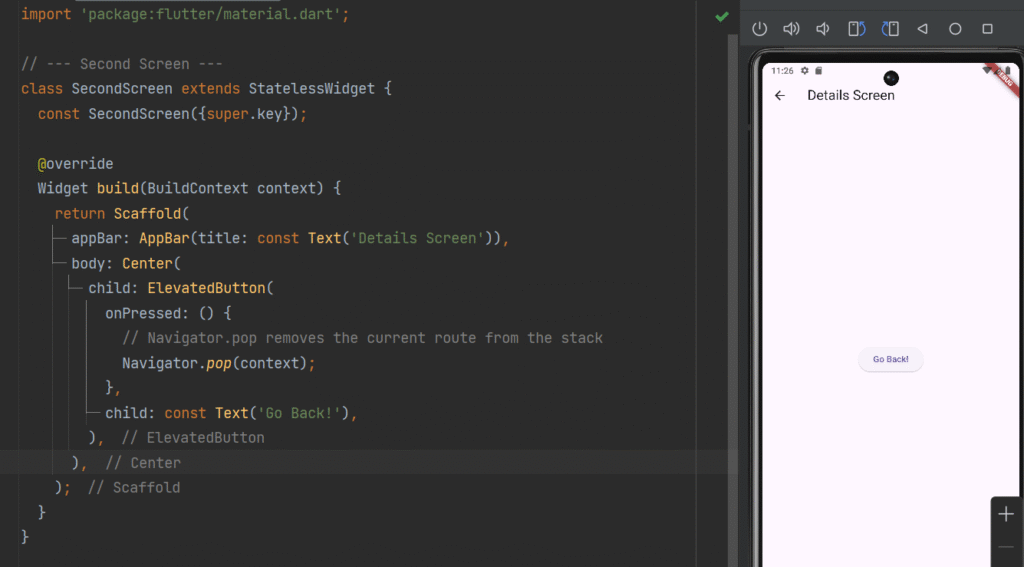
Step 2: Create Second Scree
import 'package:flutter/material.dart';

// --- Second Screen ---
class SecondScreen extends StatelessWidget {
  const SecondScreen({super.key});

  @override
  Widget build(BuildContext context) {
    return Scaffold(
      appBar: AppBar(title: const Text('Details Screen')),
      body: Center(
        child: ElevatedButton(
          onPressed: () {
            // Navigator.pop removes the current route from the stack
            Navigator.pop(context);
          },
          child: const Text('Go Back!'),
        ),
      ),
    );
  }
}
How It Works
-
MaterialPageRoutecreates a route with animation -
Navigator.push()adds a new screen to the stack -
Navigator.pop()removes the current screen
2. Passing Data Between Screens
In real-world apps, you often need to send data between screens.
Example: Passing Data Forward
Step 1: Home Screen
import 'package:flutter/material.dart';
import 'package:learnproject/second_screen.dart';

void main() {
  runApp(const MaterialApp(
    home: UserListScreen(),
  ));
}

// --- Screen 1: The Sender ---
class UserListScreen extends StatelessWidget {
  const UserListScreen({super.key});

  @override
  Widget build(BuildContext context) {
    // Sample data to pass
    final String userName = "Jane Doe";
    final int userAge = 28;

    return Scaffold(
      appBar: AppBar(title: const Text('Stateless Navigation')),
      body: Center(
        child: ElevatedButton(
          child: const Text('View User Profile'),
          onPressed: () {
            // Passing data directly into the constructor of ProfileScreen
            Navigator.push(
              context,
              MaterialPageRoute(
                builder: (context) => ProfileScreen(
                  name: userName,
                  age: userAge,
                ),
              ),
            );
          },
        ),
      ),
    );
  }
}
Step 2: Profile Screen
import 'package:flutter/material.dart';
// --- Screen 2: The Receiver ---
class ProfileScreen extends StatelessWidget {
  // 1. Declare final fields to hold the incoming data
  final String name;
  final int age;

  // 2. Add the fields to the constructor (required ensures data must be sent)
  const ProfileScreen({
    super.key,
    required this.name,
    required this.age,
  });

  @override
  Widget build(BuildContext context) {
    return Scaffold(
      appBar: AppBar(title: const Text('User Profile')),
      body: Padding(
        padding: const EdgeInsets.all(20.0),
        child: Column(
          crossAxisAlignment: CrossAxisAlignment.start,
          children: [
            Text('Name: $name', style: const TextStyle(fontSize: 22)),
            Text('Age: $age', style: const TextStyle(fontSize: 22)),
            const SizedBox(height: 20),
            ElevatedButton(
              onPressed: () => Navigator.pop(context),
              child: const Text('Back to List'),
            ),
          ],
        ),
      ),
    );
  }
}
You can also send data back using Navigator.pop().
import 'package:flutter/material.dart';
import 'package:learnproject/second_screen.dart';

void main() => runApp(const MaterialApp(home: ScreenOne()));

// --- Screen 1: The Receiver ---
class ScreenOne extends StatelessWidget {
  const ScreenOne({super.key});

  // This function handles the async wait for data
  void _startNavigation(BuildContext context) async {
    // 1. Wait for the result from the second screen
    final result = await Navigator.push(
      context,
      MaterialPageRoute(builder: (context) => const ScreenTwo()),
    );

    // 2. Use the data (e.g., show a SnackBar)
    if (context.mounted && result != null) {
      ScaffoldMessenger.of(context).showSnackBar(
        SnackBar(content: Text('Received: $result')),
      );
    }
  }

  @override
  Widget build(BuildContext context) {
    return Scaffold(
      appBar: AppBar(title: const Text('Screen One')),
      body: Center(
        child: ElevatedButton(
          onPressed: () => _startNavigation(context),
          child: const Text('Pick an Option'),
        ),
      ),
    );
  }
}
Receive data:
import 'package:flutter/material.dart';

// --- Screen 2: The Sender ---
class ScreenTwo extends StatelessWidget {
  const ScreenTwo({super.key});

  @override
  Widget build(BuildContext context) {
    return Scaffold(
      appBar: AppBar(title: const Text('Select an Option')),
      body: Center(
        child: Column(
          mainAxisAlignment: MainAxisAlignment.center,
          children: [
            ElevatedButton(
              onPressed: () => Navigator.pop(context, 'Option A'), // Sending back 'Option A'
              child: const Text('Option A'),
            ),
            ElevatedButton(
              onPressed: () => Navigator.pop(context, 'Option B'), // Sending back 'Option B'
              child: const Text('Option B'),
            ),
          ],
        ),
      ),
    );
  }
}
3. Named Routes in Flutter
Named routes help manage navigation in larger applications.
Instead of creating routes manually, you define route names.
Step 1: Define Routes in MaterialApp
void main() {
  runApp(
    MaterialApp(
      title: 'Named Routes Demo',
      // 1. Define the initial route (The home screen)
      initialRoute: '/',
      // 2. Define the routes table
      routes: {
        '/': (context) => const MainMenu(),
        '/details': (context) => const DetailsScreen(),
      },
    ),
  );
}
Step 2: Navigate Using Named Routes
ElevatedButton(
  onPressed: () {
    // 3. Navigate using the route name
    // You can pass arguments here
    Navigator.pushNamed(
      context,
      '/details',
      arguments: 'Data from Main Menu',
    );
  },
  child: const Text('Go to Details'),
),
Step 3: Passing Arguments in Named Routes
Navigator.pushNamed(
  context,
  '/details',
  arguments: 'Data from Home Screen',
);
Step 4: Receive Arguments
class DetailsScreen extends StatelessWidget {
  const DetailsScreen({super.key});

  @override
  Widget build(BuildContext context) {
    // Extract the arguments and cast them to the correct type (String)
    final args = ModalRoute.of(context)!.settings.arguments as String;

    return Scaffold(
      appBar: AppBar(title: const Text('Details Screen')),
      body: Center(
        child: Text('Data Received: $args'),
      ),
    );
  }
}
Complete Code:
Home Screen
import 'package:flutter/material.dart';
import 'package:learnproject/second_screen.dart';

void main() {
  runApp(
    MaterialApp(
      title: 'Named Routes Demo',
      // 1. Define the initial route (The home screen)
      initialRoute: '/',
      // 2. Define the routes table
      routes: {
        '/': (context) => const MainMenu(),
        '/details': (context) => const DetailsScreen(),
      },
    ),
  );
}

// --- Screen 1: Main Menu ---
class MainMenu extends StatelessWidget {
  const MainMenu({super.key});

  @override
  Widget build(BuildContext context) {
    return Scaffold(
      appBar: AppBar(title: const Text('Main Menu')),
      body: Center(
        child: ElevatedButton(
          onPressed: () {
            // 3. Navigate using the route name
            // You can pass arguments here
            Navigator.pushNamed(
              context,
              '/details',
              arguments: 'Data from Main Menu',
            );
          },
          child: const Text('Go to Details'),
        ),
      ),
    );
  }
}
Details Screen:
import 'package:flutter/material.dart';

// --- Screen 2: Details Screen ---
class DetailsScreen extends StatelessWidget {
  const DetailsScreen({super.key});

  @override
  Widget build(BuildContext context) {
    // 4. Extract the arguments sent from the previous screen
    final String args = ModalRoute.of(context)!.settings.arguments as String;

    return Scaffold(
      appBar: AppBar(title: const Text('Details')),
      body: Center(
        child: Column(
          mainAxisAlignment: MainAxisAlignment.center,
          children: [
            Text('Received: $args', style: const TextStyle(fontSize: 18)),
            const SizedBox(height: 20),
            ElevatedButton(
              onPressed: () => Navigator.pop(context),
              child: const Text('Go Back'),
            ),
          ],
        ),
      ),
    );
  }
}
Advantages of Named Routes
-
Clean and scalable code
-
Easy route management
-
Centralized navigation configuration
-
Ideal for large projects
Real-World Use Case
Imagine an E-commerce App:
-
Home Screen → Product List
-
Product List → Product Detail (with product ID)
-
Product Detail → Checkout
Navigation ensures seamless movement between screens while passing product information.
MAD LAB 01: Routing and Multi-Screen Development in Flutter: Beginner Guide with Examples
Best Practices for Flutter Navigation
✔ Use Navigator.push for simple apps
✔ Use named routes for large applications
✔ Avoid deeply nested navigation
✔ Manage state properly when passing data
✔ Use async/await for returning results
Conclusion
Navigation in Flutter is simple yet powerful. By mastering:
-
Navigator push/pop
-
Data passing between screens
-
Named routes
You can build scalable and professional mobile applications.
Flutter’s navigation system ensures a smooth user experience and structured code organization, making it ideal for both small and large projects.

")
