
Routing and Multi-Screen Development in Flutter
Introduction
Modern mobile applications consist of multiple screens such as login, dashboard, profile, and settings. In Flutter, managing these screens is done using routing and navigation.
This beginner-friendly guide will help you understand:
-
Routing in Flutter
-
Multi-screen app structure
-
Navigation using Navigator
-
Passing data between screens
-
Named routes (recommended for large apps)
-
Real-world example with complete code
What is Routing in Flutter?
Routing refers to the process of navigating between different screens (widgets) in an app.
In Flutter:
-
Each screen = a Widget
-
Each screen is called a Route
-
Navigation is handled by the Navigator
Types of Routing in Flutter
1. Direct Routing (Using MaterialPageRoute)
-
Simple navigation
-
Good for small apps
2. Named Routing
-
Uses route names (strings)
-
Better for large applications
Understanding Navigator
The Navigator works like a stack (LIFO):
-
push()→ Add new screen -
pop()→ Remove current screen
👉 Example: Home → Details → Checkout
Real-Time Example: Student App (Multi-Screen)
We will build a simple app with:
-
Home Screen
-
Student Detail Screen
-
Result Screen
Step 1: Project Structure
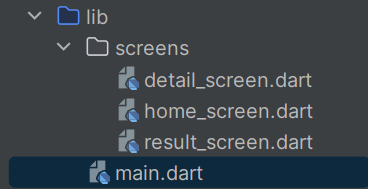
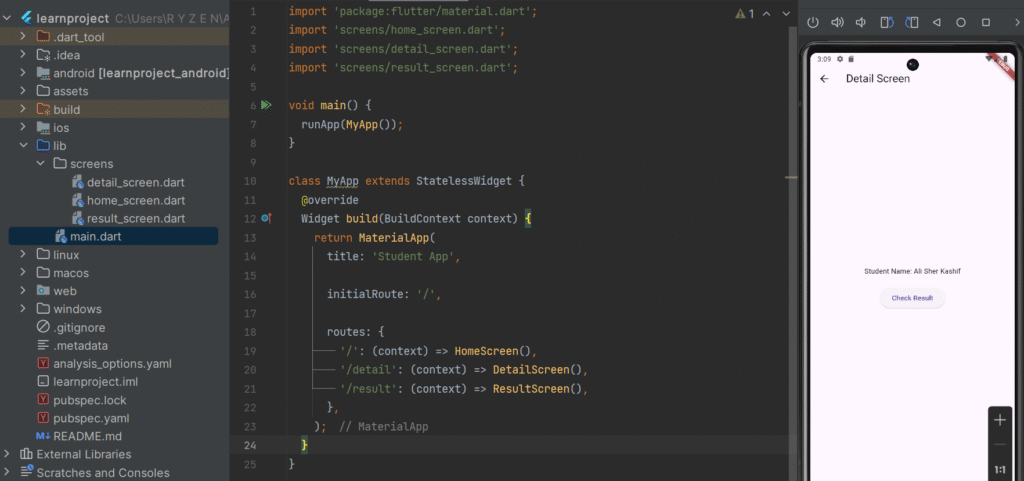
Step 2: Main File (Routes Setup)
import 'package:flutter/material.dart';
import 'screens/home_screen.dart';
import 'screens/detail_screen.dart';
import 'screens/result_screen.dart';

void main() {
  runApp(MyApp());
}

class MyApp extends StatelessWidget {
  @override
  Widget build(BuildContext context) {
    return MaterialApp(
      title: 'Student App',

      initialRoute: '/',

      routes: {
        '/': (context) => HomeScreen(),
        '/detail': (context) => DetailScreen(),
        '/result': (context) => ResultScreen(),
      },
    );
  }
}
Step 3: Home Screen
import 'package:flutter/material.dart';

class HomeScreen extends StatelessWidget {
  final TextEditingController nameController = TextEditingController();

  @override
  Widget build(BuildContext context) {
    return Scaffold(
      appBar: AppBar(title: Text("Home Screen")),
      body: Padding(
        padding: EdgeInsets.all(16),
        child: Column(
          children: [
            TextField(
              controller: nameController,
              decoration: InputDecoration(labelText: "Enter Name"),
            ),

            SizedBox(height: 20),

            ElevatedButton(
              onPressed: () {
                Navigator.pushNamed(
                  context,
                  '/detail',
                  arguments: nameController.text,
                );
              },
              child: Text("Go to Detail Screen"),
            ),
          ],
        ),
      ),
    );
  }
}
Step 4: Detail Screen (Receive Data)
import 'package:flutter/material.dart';

class DetailScreen extends StatelessWidget {
  @override
  Widget build(BuildContext context) {
    final String name =
    ModalRoute.of(context)!.settings.arguments as String;

    return Scaffold(
      appBar: AppBar(title: Text("Detail Screen")),
      body: Center(
        child: Column(
          mainAxisAlignment: MainAxisAlignment.center,
          children: [
            Text("Student Name: $name"),

            SizedBox(height: 20),

            ElevatedButton(
              onPressed: () {
                Navigator.pushNamed(
                  context,
                  '/result',
                  arguments: "Pass",
                );
              },
              child: Text("Check Result"),
            ),
          ],
        ),
      ),
    );
  }
}
Step 5: Result Screen
import 'package:flutter/material.dart';

class ResultScreen extends StatelessWidget {
  @override
  Widget build(BuildContext context) {
    final String result =
    ModalRoute.of(context)!.settings.arguments as String;

    return Scaffold(
      appBar: AppBar(title: Text("Result Screen")),
      body: Center(
        child: Text(
          "Result: $result",
          style: TextStyle(fontSize: 22),
        ),
      ),
    );
  }
}
Flow of the App
-
User enters name on Home Screen
-
Navigates to Detail Screen with data
-
Detail Screen displays name
-
User navigates to Result Screen
-
Result is displayed
Passing Data Between Screens
Send Data:
Navigator.pushNamed(
  context,
  '/detail',
  arguments: nameController.text,
);
Receive Data:
final String name = ModalRoute.of(context)!.settings.arguments as String;
Direct Routing Example (Alternative)
Navigator.push(
  context,
  MaterialPageRoute(
    builder: (context) => DetailScreen(),
  ),
);
Named Routes vs Direct Routes
| Feature | Direct Route | Named Route |
|---|---|---|
| Simplicity | Easy | Moderate |
| Scalability | Poor | Excellent |
| Code Structure | Scattered | Centralized |
| Recommended | Small apps | Large apps |
Best Practices for Multi-Screen Apps
✔ Use named routes for large projects
✔ Keep screens in separate files
✔ Pass only necessary data
✔ Avoid deep nested navigation
✔ Use meaningful route names
✔ Handle null safety properly
LAB TASK:
How to Set Up Your Flutter Project: The Car List App
Step 1: Create a New Flutter Project
Step 2: Organize the Project Structure
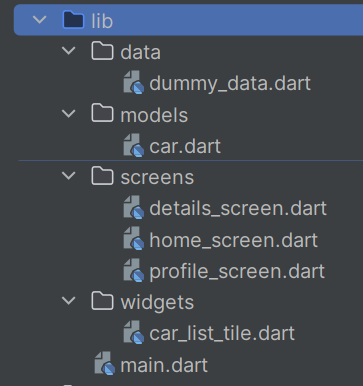
Step 3: Populate the Files
1. lib/models/car.dart
// lib/models/car.dart
class Car {
  final String id;
  final String name;
  final String imageUrl;
  final String description;

  Car({
    required this.id,
    required this.name,
    required this.imageUrl,
    required this.description,
  });
}
2. lib/data/dummy_data.dart
// lib/data/dummy_data.dart
import '../models/car.dart';

final List<Car> carList = [
  Car(
    id: '1',
    name: 'Tesla Model S',
    imageUrl: 'https://hips.hearstapps.com/hmg-prod/images/2025-tesla-model-s-2-672d42e16475f.jpg?crop=0.503xw:0.502xh;0.262xw,0.289xh&resize=980:*',
    description: 'Electric car with autopilot features.',
  ),
  Car(
    id: '2',
    name: 'BMW M4',
    imageUrl: 'https://upload.wikimedia.org/wikipedia/commons/thumb/e/e2/2021_BMW_M4_Competition_Automatic_3.0_Front.jpg/1200px-2021_BMW_M4_Competition_Automatic_3.0_Front.jpg',
    description: 'Sporty and powerful coupe.',
  ),
  Car(
    id: '3',
    name: 'Ford Mustang',
    imageUrl: 'https://images.prismic.io/carwow/c2d2e740-99e2-4faf-8cfa-b5a75c5037c0_ford-mustang-2024-lhd-front34static.jpg?auto=format&cs=tinysrgb&fit=max&q=60',
    description: 'Iconic American muscle car.',
  ),
];
3. lib/screens/home_screen.dart
// lib/screens/home_screen.dart
import 'package:flutter/material.dart';
import '../widgets/car_list_tile.dart';    // Import Car model

class HomeScreen extends StatelessWidget {
  @override
  Widget build(BuildContext context) {
    return Scaffold(
      appBar: AppBar(title: const Text('Available Cars')),
      body: ListView.builder(
        itemCount: carList.length,
        itemBuilder: (context, index) {
          final car = carList[index];
          return Card(
            margin: const EdgeInsets.all(8),
            child: ListTile(
              contentPadding: const EdgeInsets.all(10),
              leading: CircleAvatar(
                radius: 40,
                backgroundImage: NetworkImage(car.imageUrl),
              ),
              title: Text(car.name, style: const TextStyle(fontWeight: FontWeight.bold)),
              subtitle: Text(car.description, maxLines: 2, overflow: TextOverflow.ellipsis),
              onTap: () {
                Navigator.pushNamed(
                  context,
                  '/details',
                  arguments: car,
                );
              },
            ),
          );
        },
      ),
      floatingActionButton: FloatingActionButton(
        onPressed: () => Navigator.pushNamed(context, '/profile'),
        child: const Icon(Icons.person),
        tooltip: 'Go to Profile',
      ),
    );
  }
}
4. lib/screens/details_screen.dart
// lib/screens/details_screen.dart
import 'package:flutter/material.dart';
import '../models/car.dart'; // Import Car model

class DetailsScreen extends StatelessWidget {
  @override
  Widget build(BuildContext context) {
    final Car car = ModalRoute.of(context)!.settings.arguments as Car;

    return Scaffold(
      appBar: AppBar(title: Text(car.name)),
      body: Center(
        child: SingleChildScrollView(
          padding: const EdgeInsets.all(16.0),
          child: Column(
            mainAxisAlignment: MainAxisAlignment.center,
            children: [
              ClipRRect(
                borderRadius: BorderRadius.circular(20),
                child: Image.network(
                  car.imageUrl,
                  width: 250,
                  height: 250,
                  fit: BoxFit.cover,
                ),
              ),
              const SizedBox(height: 24),
              Text(
                car.name,
                style: const TextStyle(fontSize: 26, fontWeight: FontWeight.bold),
                textAlign: TextAlign.center,
              ),
              const SizedBox(height: 12),
              Text(
                car.description,
                style: const TextStyle(fontSize: 16),
                textAlign: TextAlign.center,
              ),
              const SizedBox(height: 40),
              ElevatedButton.icon(
                onPressed: () => Navigator.pop(context),
                icon: const Icon(Icons.arrow_back),
                label: const Text('Back'),
              ),
            ],
          ),
        ),
      ),
    );
  }
}
5. lib/screens/profile_screen.dart
// lib/screens/profile_screen.dart
import 'package:flutter/material.dart';

class ProfileScreen extends StatelessWidget {
  final String profileImage = 'https://www.shutterstock.com/image-vector/young-smiling-man-avatar-brown-600nw-2261401207.jpg';

  @override
  Widget build(BuildContext context) {
    return Scaffold(
      appBar: AppBar(title: const Text('My Profile')),
      body: Center(
        child: Column(
          mainAxisAlignment: MainAxisAlignment.center, // Center content vertically
          children: [
            CircleAvatar(
              radius: 60,
              backgroundImage: NetworkImage(profileImage),
            ),
            const SizedBox(height: 20),
            const Text(
              'John Doe',
              style: TextStyle(fontSize: 22, fontWeight: FontWeight.bold),
            ),
            Text('john.doe@example.com', style: TextStyle(color: Colors.grey[600])),
            const SizedBox(height: 30),
            ElevatedButton.icon(
              onPressed: () => Navigator.pop(context),
              icon: const Icon(Icons.arrow_back),
              label: const Text('Back to Home'),
            ),
          ],
        ),
      ),
    );
  }
}
6. lib/main.dart
// lib/main.dart
import 'package:flutter/material.dart';
import 'screens/home_screen.dart';    // Import HomeScreen
import 'screens/details_screen.dart'; // Import DetailsScreen
import 'screens/profile_screen.dart'; // Import ProfileScreen

void main() => runApp(const MyApp()); // Add const for MyApp

class MyApp extends StatelessWidget {
  const MyApp({super.key}); // Add const constructor

  @override
  Widget build(BuildContext context) {
    return MaterialApp(
      title: 'Car List App',
      theme: ThemeData(primarySwatch: Colors.blue),
      initialRoute: '/',
      routes: {
        '/': (context) =>  HomeScreen(),      // Add const to screen widgets
        '/details': (context) =>  DetailsScreen(),
        '/profile': (context) =>  ProfileScreen(),
      },
    );
  }
}
Step 4: Run Your Application
![]()
![]()
![]()
Conclusion
Routing and multi-screen development are essential skills for any Flutter developer. By understanding:
-
Navigator (push & pop)
-
Named routes
-
Data passing between screens
You can build scalable, maintainable, and user-friendly applications.
This foundation will help you create real-world apps like:
-
E-commerce systems
-
Student management apps
-
Dashboard-based applications

")
