
Firebase Firestore in Flutter: Complete Guide to Save & Read Cloud Data
Introduction
Modern mobile applications require real-time, secure, and scalable databases to store and manage data efficiently. If you are building a Flutter app and looking for a powerful cloud database solution, Firebase Firestore by Google is one of the best options available.
Firestore is a NoSQL cloud database that allows developers to store, sync, and retrieve app data in real time. When integrated with Flutter, it enables developers to build dynamic applications with live updates and seamless data management.
In this tutorial, you will learn how to use Firebase Firestore in Flutter for CRUD operations (Create, Read, Update, Delete) with practical examples.
Whether you are a beginner or an intermediate Flutter developer, this guide will help you master Firestore integration step by step.
What is Firebase Firestore?
Cloud Firestore is a cloud-hosted NoSQL database provided by Google as part of the Firebase ecosystem.
It allows developers to:
- Store app data in collections and documents
- Synchronize data in real time
- Work offline
- Secure data using rules
- Scale automatically
Why Use Firestore with Flutter?
Flutter and Firestore are a perfect combination because they provide:
✅ Real-time data synchronization
✅ Easy integration
✅ Cross-platform support
✅ Cloud storage
✅ Secure authentication support
✅ Scalable backend infrastructure
In this guide, you’ll learn how to set up Firestore in Flutter and perform the most important operations including saving, reading, updating, and deleting data. We will also walk through a real-world example to show you how Firestore works inside a complete app.
What Is Firebase Firestore?
Firebase Firestore is a NoSQL cloud database by Google. Instead of storing information in tables, it stores data in:
-
Collections
-
Documents
-
Fields
This structure makes it flexible and perfect for mobile apps where data needs to sync quickly.
SQL vs NoSQL
SQL and NoSQL are two different types of database management systems used to store, manage, and retrieve data.
| Feature | SQL | NoSQL |
|---|---|---|
| Full Form | Structured Query Language | Not Only SQL |
| Database Type | Relational Database | Non-Relational Database |
| Data Storage | Tables (rows and columns) | Documents, Key-Value, Graphs, Wide-column |
| Schema | Fixed / Predefined Schema | Dynamic / Flexible Schema |
| Scalability | Vertical Scaling (increase server power) | Horizontal Scaling (add more servers) |
| Query Language | Uses SQL commands | No standard query language |
| Relationships | Supports complex relationships using joins | Limited relationships |
| Consistency | Strong consistency (ACID) | Often eventual consistency (BASE) |
| Performance | Better for complex queries | Better for large-scale distributed data |
| Examples | MySQL, PostgreSQL, Oracle Database | MongoDB, Cassandra, Redis |
Key Difference
SQL: Best when data structure is fixed, and relationships are important.
NoSQL: Best when data changes frequently and scalability is needed.
Why Use Firestore in Flutter?
Here are a few reasons why Flutter developers prefer Firestore:
🔥 Real-time database updates
🌐 Cloud-hosted and scalable
📱 Offline mode support
⚡ Fast query performance
🔒 Secure access rules
🔄 Easy integration with Firebase Authentication
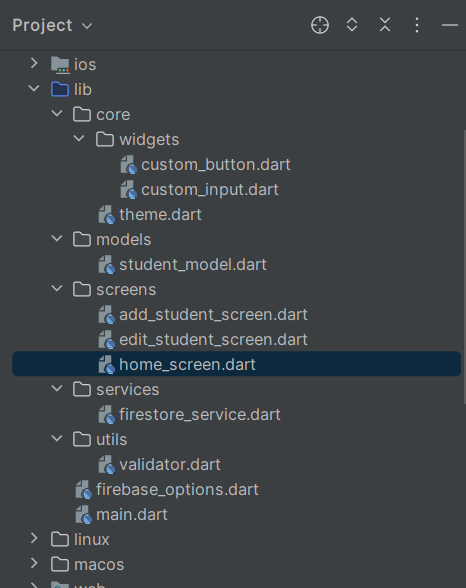
🟦 Step 1: Add Firebase to Your Flutter App
Run the command in your Flutter project (Terminal):
- flutterfire configure
🟦 Step 2: Add Required Packages
In pubspec.yaml:
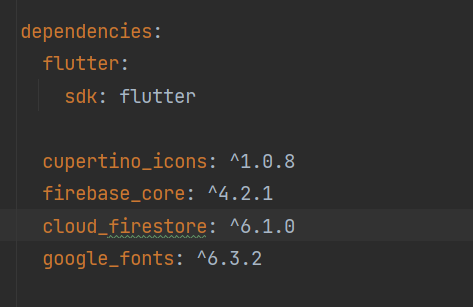
dependencies:
flutter:
sdk: flutter
firebase_core: ^3.0.0
cloud_firestore: ^5.0.0
google_fonts: ^6.0.0
🟦 Step 3 — Initialize Firebase
main.dart
import 'package:flutter/material.dart';
import 'package:firebase_core/firebase_core.dart';
import 'screens/home_screen.dart';

void main() async {
  WidgetsFlutterBinding.ensureInitialized();
  await Firebase.initializeApp();
  runApp(StudentApp());
}

class StudentApp extends StatelessWidget {
  @override
  Widget build(BuildContext context) {
    return MaterialApp(
      debugShowCheckedModeBanner: false,
      title: "Student Manager",
      home: HomeScreen(),
    );
  }
}
🎨 Step 4: App Theme (Modern UI)
core/theme.dart
import 'package:flutter/material.dart';
import 'package:google_fonts/google_fonts.dart';

class AppTheme {
  static ThemeData lightTheme = ThemeData(
    primaryColor: Colors.deepPurple,
    scaffoldBackgroundColor: Colors.white,
    textTheme: GoogleFonts.poppinsTextTheme(),
    appBarTheme: AppBarTheme(
      elevation: 1,
      backgroundColor: Colors.deepPurple,
      titleTextStyle: TextStyle(
          fontSize: 20, fontWeight: FontWeight.bold, color: Colors.white
      ),
    ),
  );
}
🧩 Step 5: Student Model
models/student_model.dart
class Student {
  final String id;
  final String name;
  final String rollNo;
  final int marks;

  Student({
    required this.id,
    required this.name,
    required this.rollNo,
    required this.marks,
  });

  Map<String, dynamic> toMap() {
    return {
      "name": name,
      "rollNo": rollNo,
      "marks": marks,
    };
  }

  factory Student.fromMap(Map<String, dynamic> data, String id) {
    return Student(
      id: id,
      name: data["name"],
      rollNo: data["rollNo"],
      marks: data["marks"],
    );
  }
}
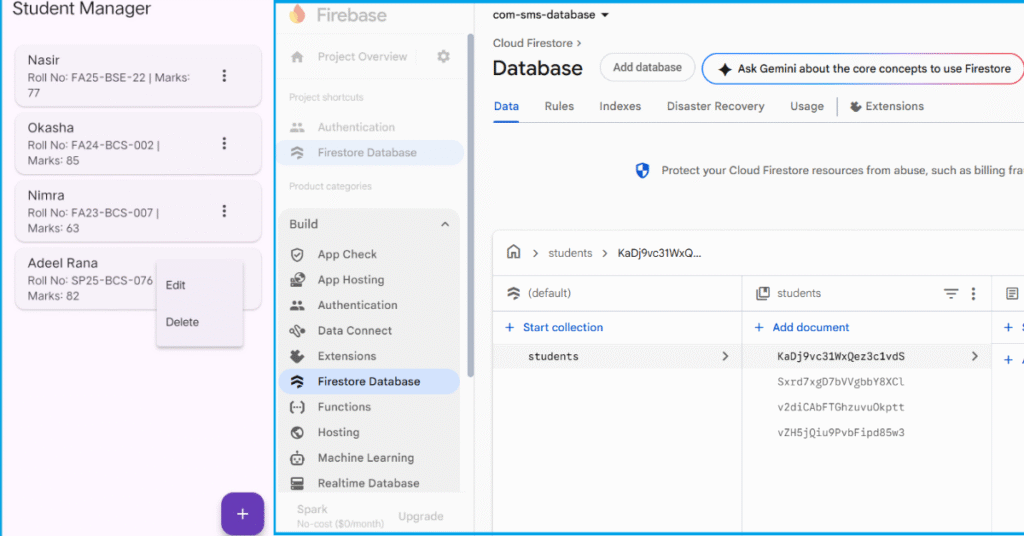
🔥 Step 6: Firestore Service (CRUD Operations)
services/firestore_service.dart
import 'package:cloud_firestore/cloud_firestore.dart';
import '../models/student_model.dart';

class FirestoreService {
  final CollectionReference students =
  FirebaseFirestore.instance.collection("students");

  Future<void> addStudent(Student student) {
    return students.add(student.toMap());
  }

  Stream<List<Student>> getStudents() {
    return students.snapshots().map((snapshot) =>
        snapshot.docs.map((doc) => Student.fromMap(doc.data() as Map<String, dynamic>, doc.id)).toList());
  }

  Future<void> updateStudent(Student student) {
    return students.doc(student.id).update(student.toMap());
  }

  Future<void> deleteStudent(String id) {
    return students.doc(id).delete();
  }
}
📄 Reusable Input Field
core/widgets/custom_input.dart
import 'package:flutter/material.dart';

class CustomInput extends StatelessWidget {
  final String hint;
  final TextEditingController controller;
  final TextInputType keyboard;

  CustomInput({
    required this.hint,
    required this.controller,
    this.keyboard = TextInputType.text,
  });

  @override
  Widget build(BuildContext context) {
    return TextField(
      controller: controller,
      keyboardType: keyboard,
      decoration: InputDecoration(
        labelText: hint,
        border: OutlineInputBorder(
          borderRadius: BorderRadius.circular(12),
        ),
      ),
    );
  }
}
🔘 Reusable Button
core/widgets/custom_button.dart
import 'package:flutter/material.dart';

class CustomButton extends StatelessWidget {
  final String text;
  final VoidCallback onPressed;

  CustomButton({required this.text, required this.onPressed});

  @override
  Widget build(BuildContext context) {
    return Container(
      width: double.infinity,
      height: 55,
      child: ElevatedButton(
        style: ElevatedButton.styleFrom(
          shape: RoundedRectangleBorder(
            borderRadius: BorderRadius.circular(12),
          ),
          backgroundColor: Colors.deepPurple,
          foregroundColor: Colors.white,
        ),
        onPressed: onPressed,
        child: Text(text, style: TextStyle(fontSize: 16)),
      ),
    );
  }
}
🏠 Home Screen: Real-Time Student List
screens/home_screen.dart
import 'package:flutter/material.dart';
import '../services/firestore_service.dart';
import '../models/student_model.dart';
import 'add_student_screen.dart';
import 'edit_student_screen.dart';

class HomeScreen extends StatelessWidget {
  final FirestoreService service = FirestoreService();

  @override
  Widget build(BuildContext context) {
    return Scaffold(
      appBar: AppBar(title: Text("Student Manager")),
      floatingActionButton: FloatingActionButton(
        backgroundColor: Colors.deepPurple,
        child: Icon(Icons.add, color: Colors.white),
        onPressed: () => Navigator.push(context,
            MaterialPageRoute(builder: (_) => AddStudentScreen())),
      ),

      body: StreamBuilder<List<Student>>(
        stream: service.getStudents(),
        builder: (context, snapshot) {
          if (snapshot.hasError) return Center(child: Text("Error loading data"));
          if (!snapshot.hasData) return Center(child: CircularProgressIndicator());

          final students = snapshot.data!;

          return ListView.builder(
            padding: EdgeInsets.all(16),
            itemCount: students.length,
            itemBuilder: (context, index) {
              final s = students[index];

              return Card(
                shape: RoundedRectangleBorder(borderRadius: BorderRadius.circular(12)),
                child: ListTile(
                  title: Text(s.name),
                  subtitle: Text("Roll No: ${s.rollNo} | Marks: ${s.marks}"),
                  trailing: PopupMenuButton(
                    onSelected: (value) {
                      if (value == "edit") {
                        Navigator.push(context, MaterialPageRoute(
                          builder: (_) => EditStudentScreen(student: s),
                        ));
                      } else {
                        service.deleteStudent(s.id);
                      }
                    },
                    itemBuilder: (_) => [
                      PopupMenuItem(value: "edit", child: Text("Edit")),
                      PopupMenuItem(value: "delete", child: Text("Delete")),
                    ],
                  ),
                ),
              );
            },
          );
        },
      ),
    );
  }
}
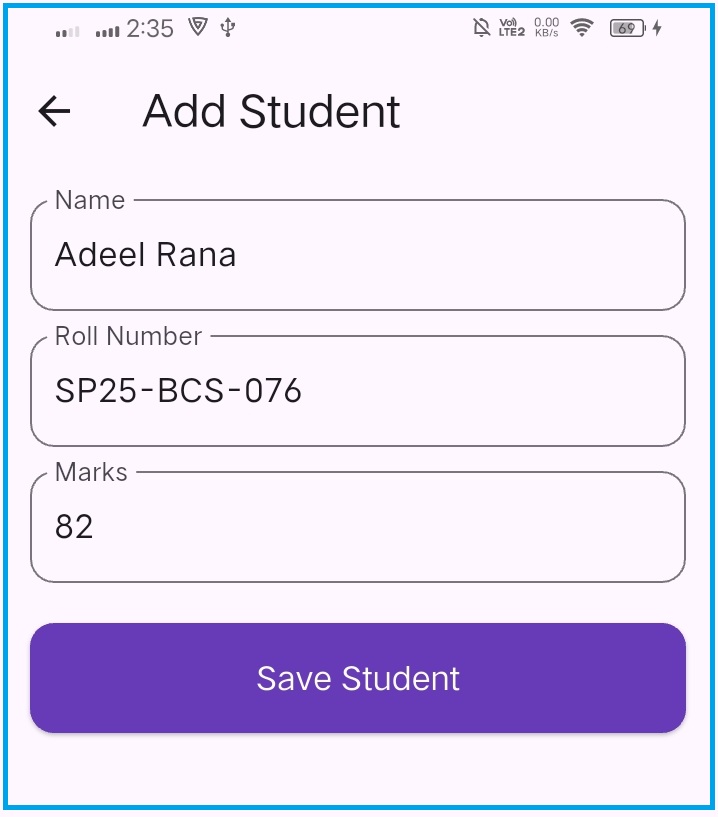
➕ Add Student Screen
screens/add_student_screen.dart
import 'package:flutter/material.dart';
import '../core/widgets/custom_input.dart';
import '../core/widgets/custom_button.dart';
import '../services/firestore_service.dart';
import '../models/student_model.dart';

class AddStudentScreen extends StatelessWidget {
  final nameC = TextEditingController();
  final rollC = TextEditingController();
  final marksC = TextEditingController();

  final FirestoreService service = FirestoreService();

  @override
  Widget build(BuildContext context) {
    return Scaffold(
      appBar: AppBar(title: Text("Add Student")),
      body: Padding(
        padding: EdgeInsets.all(16),
        child: Column(
          children: [
            CustomInput(hint: "Name", controller: nameC),
            SizedBox(height: 12),
            CustomInput(hint: "Roll Number", controller: rollC),
            SizedBox(height: 12),
            CustomInput(
              hint: "Marks",
              controller: marksC,
              keyboard: TextInputType.number,
            ),
            SizedBox(height: 20),
            CustomButton(
              text: "Save Student",
              onPressed: () {
                if (nameC.text.isEmpty || rollC.text.isEmpty || marksC.text.isEmpty) {
                  ScaffoldMessenger.of(context).showSnackBar(
                    SnackBar(content: Text("All fields are required")),
                  );
                  return;
                }

                final student = Student(
                  id: "",
                  name: nameC.text.trim(),
                  rollNo: rollC.text.trim(),
                  marks: int.parse(marksC.text),
                );

                service.addStudent(student);

                Navigator.pop(context);
              },
            )
          ],
        ),
      ),
    );
  }
}
✏️ Edit Student Screen
screens/edit_student_screen.dart
import 'package:flutter/material.dart';
import '../models/student_model.dart';
import '../services/firestore_service.dart';
import '../core/widgets/custom_button.dart';
import '../core/widgets/custom_input.dart';

class EditStudentScreen extends StatefulWidget {
  final Student student;

  EditStudentScreen({required this.student});

  @override
  _EditStudentScreenState createState() => _EditStudentScreenState();
}

class _EditStudentScreenState extends State<EditStudentScreen> {
  late TextEditingController nameC;
  late TextEditingController rollC;
  late TextEditingController marksC;

  final FirestoreService service = FirestoreService();

  @override
  void initState() {
    super.initState();

    nameC = TextEditingController(text: widget.student.name);
    rollC = TextEditingController(text: widget.student.rollNo);
    marksC = TextEditingController(text: widget.student.marks.toString());
  }

  @override
  Widget build(BuildContext context) {
    return Scaffold(
      appBar: AppBar(title: Text("Edit Student")),
      body: Padding(
        padding: EdgeInsets.all(16),
        child: Column(
          children: [
            CustomInput(hint: "Name", controller: nameC),
            SizedBox(height: 12),
            CustomInput(hint: "Roll Number", controller: rollC),
            SizedBox(height: 12),
            CustomInput(
              hint: "Marks",
              controller: marksC,
              keyboard: TextInputType.number,
            ),
            SizedBox(height: 20),
            CustomButton(
              text: "Update Student",
              onPressed: () {
                final updatedStudent = Student(
                  id: widget.student.id,
                  name: nameC.text.trim(),
                  rollNo: rollC.text.trim(),
                  marks: int.parse(marksC.text),
                );

                service.updateStudent(updatedStudent);

                Navigator.pop(context);
              },
            ),
          ],
        ),
      ),
    );
  }
}

🎉 Your Student Management App Is Ready!
You now have:
✔ Clean and scalable architecture
✔ Firebase Firestore CRUD
✔ Elegant UI with Google Fonts
✔ Validation + Snackbars
✔ Real-time updates
✔ Modern card-based layout
🙏 Thank You for Reading!
Thank you so much for taking out your valuable time to read this guide. I truly hope it helped you understand how to build a complete and functional Student Management App using Flutter and Firebase Firestore.
If you enjoyed this article and want to stay updated with more practical Flutter tutorials, real-world app guides, and step-by-step development tips, don’t forget to subscribe to the blog. Your support motivates me to create even more helpful content for the community!
Stay tuned — more exciting tutorials are coming soon! 🚀📲

")
