
How to Build a Complete Flutter Authentication System with Firebase: Login, Signup, Reset Password & Dashboard Guide
Introduction!
User authentication is one of the first features developers need when building a modern mobile application. Whether you’re creating a social platform, an e-commerce app, or a simple personal project, having a secure login and signup system is essential. That’s where Firebase Authentication steps in—it offers fast, reliable, and developer-friendly tools to handle user accounts without the hassle of writing server-side code.
In this guide, we’ll walk through the entire process of building a complete authentication system in Flutter. From setting up Firebase using the CLI to designing clean UI screens for login, signup, and password recovery, you’ll learn how to bring everything together into a fully functional experience. We’ll also implement a simple dashboard and enable logout functionality, giving you a complete, real-world authentication flow that you can immediately use or adapt for your own projects.
Before we dive into the UI and logic, we begin with a quick overview of Firebase and how it helps streamline mobile app development.
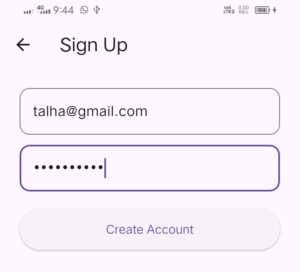
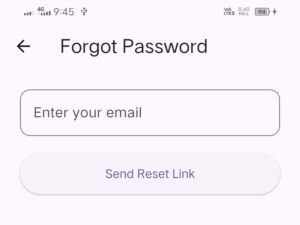
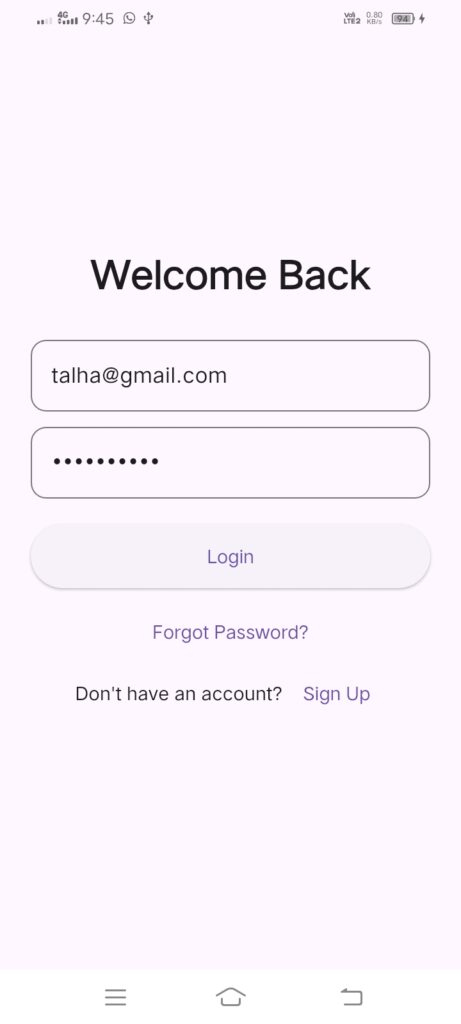
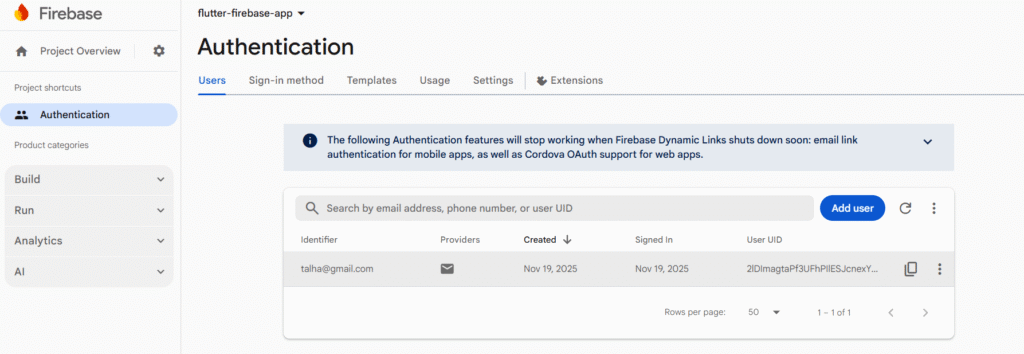
Brief Introduction to Firebase Database!
Firebase Database is a cloud-hosted NoSQL storage solution that allows apps to read and write data in real time. Instead of managing your own backend server, Firebase gives you an instantly scalable database that syncs information across users and devices. It’s ideal for chat apps, user profiles, live dashboards, and any feature that requires immediate updates. With its simple API and strong integration with Flutter, developers can build dynamic, data-driven mobile apps faster and with fewer errors.
Before you start your project implementation, you must visit the step-by-step guidance on Firebase configuration in the Flutter project. Visit the link below after completing the setup, now move forward.
MAD Lesson 19: Flutter Firebase Authentication Tutorial: Step-by-Step User Login & Signup Guide
In this blog, you will learn a clean, elegant, and fully functional Flutter Authentication UI Kit that includes:
✅ Login
✅ Signup
✅ Forgot Password
✅ Dashboard
✅ Logout
✅ Firebase Authentication Integration
✅ Modern, neat UI (Material 3)
This is a complete, working mini-project that you can copy and paste into your Flutter app.
Flutter Project Structure!
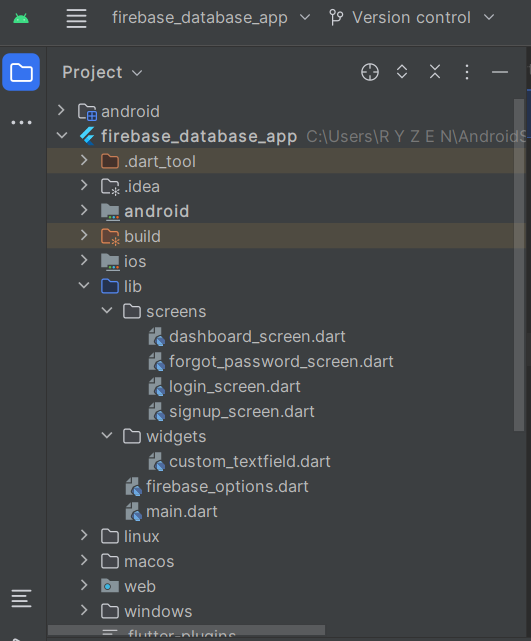
📌 main.dart
import 'package:flutter/material.dart';
import 'package:firebase_core/firebase_core.dart';
import 'firebase_options.dart';
import 'screens/login_screen.dart';
import 'screens/dashboard_screen.dart';
import 'package:firebase_auth/firebase_auth.dart';

void main() async {
  WidgetsFlutterBinding.ensureInitialized();
  await Firebase.initializeApp(
    options: DefaultFirebaseOptions.currentPlatform,
  );
  runApp(const MyApp());
}

class MyApp extends StatelessWidget {
  const MyApp({super.key});

  @override
  Widget build(BuildContext context) {
    return MaterialApp(
      title: 'Firebase Auth UI Kit',
      debugShowCheckedModeBanner: false,
      theme: ThemeData(useMaterial3: true),
      home: StreamBuilder<User?>(
        stream: FirebaseAuth.instance.authStateChanges(),
        builder: (context, snapshot) {
          if (snapshot.hasData) {
            return const DashboardScreen();
          } else {
            return const LoginScreen();
          }
        },
      ),
    );
  }
}
📌 widgets/custom_textfield.dart
import 'package:flutter/material.dart';

class CustomTextField extends StatelessWidget {
  final TextEditingController controller;
  final String hint;
  final bool obscure;

  const CustomTextField({
    super.key,
    required this.controller,
    required this.hint,
    this.obscure = false,
  });

  @override
  Widget build(BuildContext context) {
    return TextField(
      controller: controller,
      obscureText: obscure,
      decoration: InputDecoration(
        hintText: hint,
        contentPadding: const EdgeInsets.all(16),
        border: OutlineInputBorder(
          borderRadius: BorderRadius.circular(12),
        ),
      ),
    );
  }
}
📌 screens/login_screen.dart
import 'package:flutter/material.dart';
import 'package:firebase_auth/firebase_auth.dart';
import '../widgets/custom_textfield.dart';
import 'signup_screen.dart';
import 'forgot_password_screen.dart';

class LoginScreen extends StatefulWidget {
  const LoginScreen({super.key});

  @override
  State<LoginScreen> createState() => _LoginScreenState();
}

class _LoginScreenState extends State<LoginScreen> {
  final emailController = TextEditingController();
  final passController = TextEditingController();

  bool loading = false;

  login() async {
    setState(() => loading = true);
    try {
      await FirebaseAuth.instance.signInWithEmailAndPassword(
        email: emailController.text.trim(),
        password: passController.text.trim(),
      );
    } catch (e) {
      ScaffoldMessenger.of(context)
          .showSnackBar(SnackBar(content: Text(e.toString())));
    }
    setState(() => loading = false);
  }

  @override
  Widget build(BuildContext context) {
    return Scaffold(
      body: Center(
        child: SingleChildScrollView(
          padding: const EdgeInsets.all(24),
          child: Column(
            children: [
              const Text(
                "Welcome Back",
                style: TextStyle(fontSize: 30, fontWeight: FontWeight.bold),
              ),
              const SizedBox(height: 30),

              CustomTextField(
                controller: emailController,
                hint: "Email",
              ),
              const SizedBox(height: 12),

              CustomTextField(
                controller: passController,
                hint: "Password",
                obscure: true,
              ),
              const SizedBox(height: 20),

              ElevatedButton(
                onPressed: loading ? null : login,
                style: ElevatedButton.styleFrom(
                  minimumSize: const Size(double.infinity, 50),
                ),
                child: loading
                    ? const CircularProgressIndicator()
                    : const Text("Login"),
              ),
              const SizedBox(height: 10),

              TextButton(
                onPressed: () => Navigator.push(
                  context,
                  MaterialPageRoute(
                      builder: (_) => const ForgotPasswordScreen()),
                ),
                child: const Text("Forgot Password?"),
              ),

              Row(
                mainAxisAlignment: MainAxisAlignment.center,
                children: [
                  const Text("Don't have an account? "),
                  TextButton(
                    onPressed: () => Navigator.push(
                      context,
                      MaterialPageRoute(builder: (_) => const SignupScreen()),
                    ),
                    child: const Text("Sign Up"),
                  ),
                ],
              )
            ],
          ),
        ),
      ),
    );
  }
}
📌 screens/signup_screen.dart
import 'package:flutter/material.dart';
import 'package:firebase_auth/firebase_auth.dart';
import '../widgets/custom_textfield.dart';

class SignupScreen extends StatefulWidget {
  const SignupScreen({super.key});

  @override
  State<SignupScreen> createState() => _SignupScreenState();
}

class _SignupScreenState extends State<SignupScreen> {
  final emailController = TextEditingController();
  final passController = TextEditingController();

  bool loading = false;

  signup() async {
    setState(() => loading = true);
    try {
      await FirebaseAuth.instance.createUserWithEmailAndPassword(
        email: emailController.text.trim(),
        password: passController.text.trim(),
      );
      Navigator.pop(context);
      ScaffoldMessenger.of(context).showSnackBar(
          const SnackBar(content: Text("Signup Successful! Login Now.")));
    } catch (e) {
      ScaffoldMessenger.of(context)
          .showSnackBar(SnackBar(content: Text(e.toString())));
    }
    setState(() => loading = false);
  }

  @override
  Widget build(BuildContext context) {
    return Scaffold(
      appBar: AppBar(title: const Text("Sign Up")),
      body: Padding(
        padding: const EdgeInsets.all(24),
        child: Column(
          children: [
            CustomTextField(controller: emailController, hint: "Email"),
            const SizedBox(height: 12),
            CustomTextField(
              controller: passController,
              hint: "Password",
              obscure: true,
            ),
            const SizedBox(height: 20),
            ElevatedButton(
              onPressed: loading ? null : signup,
              style: ElevatedButton.styleFrom(
                minimumSize: const Size(double.infinity, 50),
              ),
              child: loading
                  ? const CircularProgressIndicator()
                  : const Text("Create Account"),
            ),
          ],
        ),
      ),
    );
  }
}
📌 screens/forgot_password_screen.dart
import 'package:flutter/material.dart';
import 'package:firebase_auth/firebase_auth.dart';
import '../widgets/custom_textfield.dart';

class ForgotPasswordScreen extends StatefulWidget {
  const ForgotPasswordScreen({super.key});

  @override
  State<ForgotPasswordScreen> createState() => _ForgotPasswordScreenState();
}

class _ForgotPasswordScreenState extends State<ForgotPasswordScreen> {
  final emailController = TextEditingController();
  bool loading = false;

  resetPassword() async {
    setState(() => loading = true);
    try {
      await FirebaseAuth.instance
          .sendPasswordResetEmail(email: emailController.text.trim());

      ScaffoldMessenger.of(context).showSnackBar(const SnackBar(
        content: Text("Password reset link sent to email."),
      ));
    } catch (e) {
      ScaffoldMessenger.of(context)
          .showSnackBar(SnackBar(content: Text(e.toString())));
    }
    setState(() => loading = false);
  }

  @override
  Widget build(BuildContext context) {
    return Scaffold(
      appBar: AppBar(title: const Text("Forgot Password")),
      body: Padding(
        padding: const EdgeInsets.all(24),
        child: Column(
          children: [
            CustomTextField(
              controller: emailController,
              hint: "Enter your email",
            ),
            const SizedBox(height: 20),
            ElevatedButton(
              onPressed: loading ? null : resetPassword,
              style: ElevatedButton.styleFrom(
                minimumSize: const Size(double.infinity, 50),
              ),
              child: loading
                  ? const CircularProgressIndicator()
                  : const Text("Send Reset Link"),
            ),
          ],
        ),
      ),
    );
  }
}
📌 screens/dashboard_screen.dart
import 'package:flutter/material.dart';
import 'package:firebase_auth/firebase_auth.dart';

class DashboardScreen extends StatelessWidget {
  const DashboardScreen({super.key});

  @override
  Widget build(BuildContext context) {
    final user = FirebaseAuth.instance.currentUser;

    return Scaffold(
      appBar: AppBar(
        title: const Text("Dashboard"),
        actions: [
          IconButton(
            icon: const Icon(Icons.logout),
            onPressed: () => FirebaseAuth.instance.signOut(),
          ),
        ],
      ),
      body: Center(
        child: Text(
          "Logged in as\n${user?.email}",
          textAlign: TextAlign.center,
          style: const TextStyle(fontSize: 22),
        ),
      ),
    );
  }
}
⭐ Final Words — You Did It!
Congratulations on completing this milestone! 🎉
You’ve just built a fully functional authentication system in Flutter using Firebase — complete with Login, Signup, Password Reset, and a clean Dashboard flow. That’s a major step forward in your app development journey, and you should be proud of what you’ve accomplished today.
If this tutorial helped you learn something new, consider subscribing or following the blog so you never miss upcoming guides. More deep-dive tutorials on Flutter, Firebase, UI design, and real-world app development are on the way — and trust me, you’ll want to stay tuned.
Stay curious, keep experimenting, and continue building amazing things.
See you in the next blog! 🚀✨


1 Comment
Pingback: Flutter Firebase Authentication Tutorial: Step-by-Step User Login & Signup Guide - onlineskilllab.com